Claws
What is Claws?

It is Free Software and is available for a variety of Unix-type platforms, and Windows. You can download Claws Mail from the Claws Mail website.
Claws Mail aims to be feature rich, fast, and stable. It has IMAP and POP support, multiple account support, colored labels, spell checking, filtering, and support for OpenPGP encryption.
Setup Claws Mail
The First Time – Setup Wizard
The first time you run Claws Mail, the setup wizard will walk you through setting up an account. If the wizard does not open, see section “Manual Account Creation” below.
- Enter your name/alias and e-mail address on the first page
- Click “Forward” to advance to the next screen
- Choose server type as POP3 or IMAP (IMAP leaves mail on server, POP3 downloads it locally – this means IMAP is a good choice if you have multiple machines accessing the mailbox and POP3 is a slightly better choice for privacy, the POP3 user experience is much faster and it unburdens your Espace de stockage et quota)
- Enter mail.riseup.net for the Server address (both for IMAP and POP3)
- Enter your username (without @riseup.net) and password
- Select Use SSL to connect to receiving server and also select Use SSL via STARTTLS
- Click Forward to advance to the next screen
- Enter mail.riseup.net for the SMTP server address
- Select Use authentication (you can leave the SMTP username and password fields blank)
- Select Use SSL to connect to receiving server" and also select "Use SSL via STARTTLS
- Click Forward to advance to the next screen
- Click Save to complete the process
Manual Account Creation
While running Claws Mail select Configuration > Create New Account from the menubar.
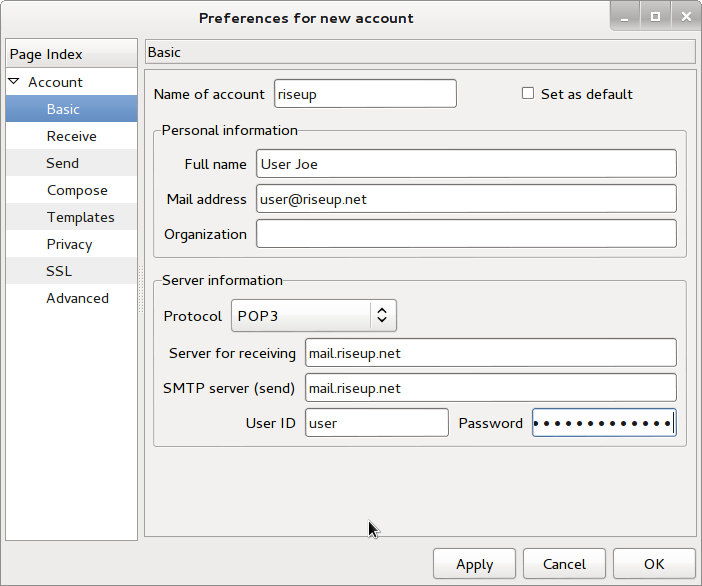
- Basic Settings – enter a name for your account, enter your name, mail address, select POP3 or IMAP, enter mail.riseup.net for both the “Server for receiving” and “SMTP server (send)” fields, and your riseup.net userid (without @riseup.net) and password
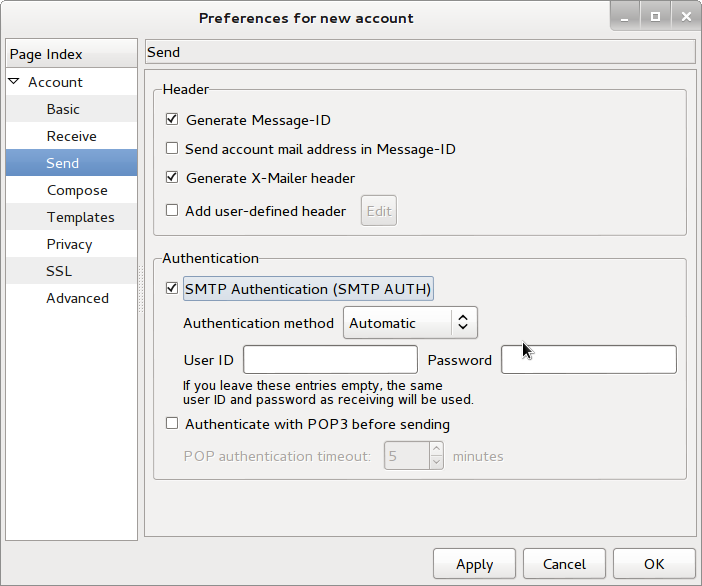
- Send Settings – select SMTP Authentication
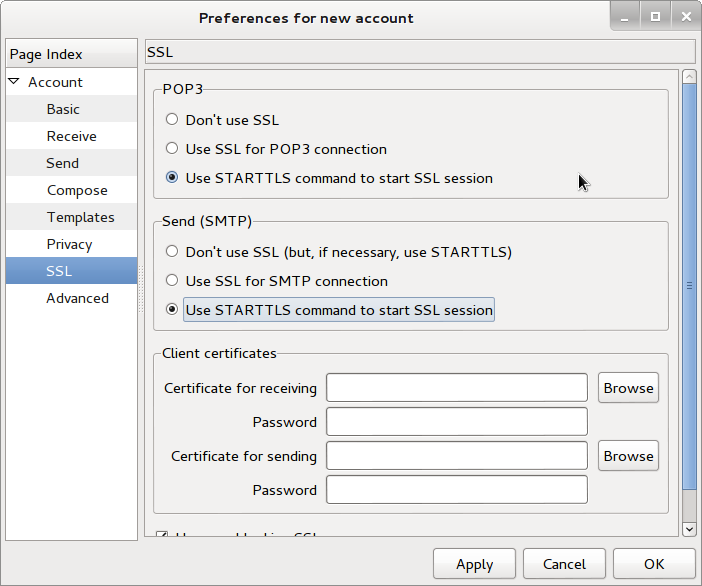
- SSL Settings – Select STARTTLS for both POP3 and SMTP.
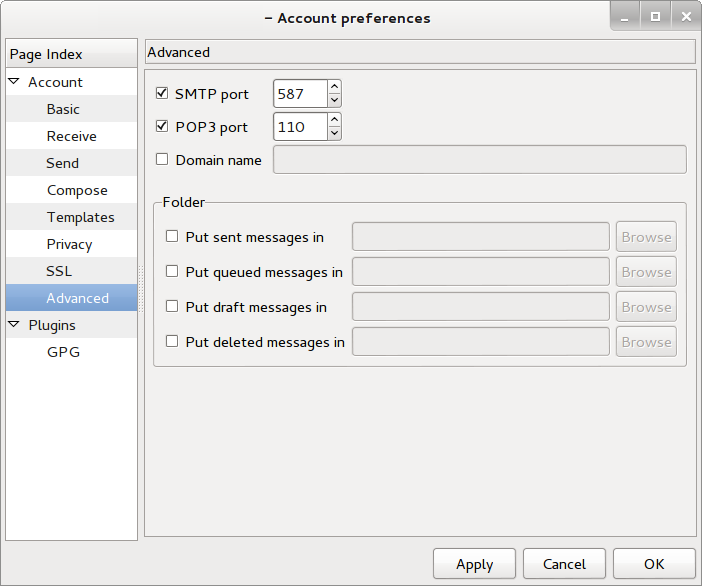
- Advanced settings – Change the SMTP port to 587 (POP3 can stay as 110)
- Click “OK” to finish adding your new account
First Time, SSL Certificates
When checking your mail for the first time, and also sending your first message, you will see an SSL confirmation dialog. Click View certificate (the fingerprint shown on the image may be outdated):
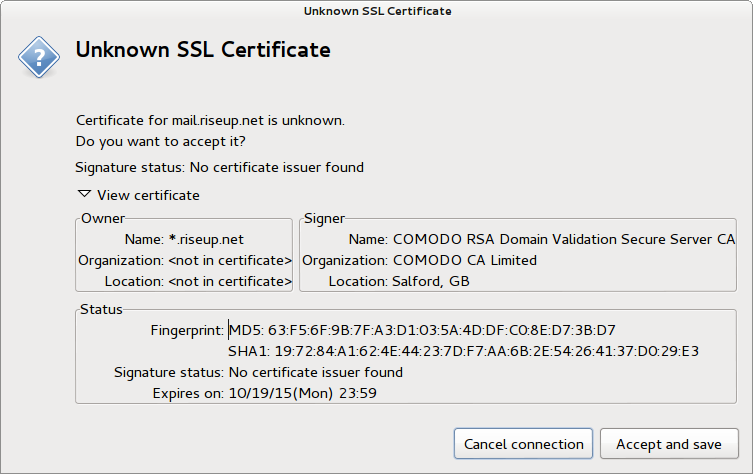
On first use claws Mail will store these certificates and let you know if they ever change which may indicate an attempted man-in-the-attack, or just that riseup.net updated their certificates. Every time you get this SSL pop-up, verify the fingerprints with the ones published by Riseup]]!
You’re Done!
If you are using IMAP everything should just work automatically. If you are using POP3 click the “Get Mail” icon in the toolbar to refresh your mail.
Enhance your email security
- Chiffrez vos courriels ! Pour améliorer la sécurité des messages utilisez Courriels cryptés.
- Il y a de nombreuses vulnérabilités avec comment les connections sécurisées marchent. Si vous avez besoin d’une sécurité élevée, vous devriez toujours vous connecter aux services Riseup en utilisant le VPN Riseup. Cela devrait éviter une longue liste de potentielles attaques contre vos communications.
- Pour améliorer la sécurité de votre connexion vous pouvez utiliser Onion Service configuration pour vous connecter aux services .onion de Riseup avec IMAP et SMTP. Regardez les adresses
mail.*.onionetsmtp.*.onioncorrespondantes dans la page en lien et remplacezmail.riseup.netpour chaque serveur. Note: * Le port SMTP 465 est souvent bloqué par les nœuds de sortie, mais le port 587 est moins fréquemment bloqué. Si vous avez un problème pour envoyer un courriel, essayez le port 587 ou configurez votre client pour utiliser les services cachés courriel de Riseup à la place du domaine habituelmail.riseup.net. C’est mieux que d’envoyer votre trafic à travers une sortie Tor car c’est résistant aux attaques MITM mais cela peut causer des problèmes de certificat côté client.